1 Toolbar
Toolbar provides an interface to the various Erlang tools which are available. Toolbar can also provide access to user supplied tools which are included with the Erlang software release. These tools are called GS Contributions.
All tools included in Toolbar must have a configuration file which contains information about the tool, such as its start function and the location of help information. The name of a configuration file must include the suffix .tool.
Start the Toolbar application with one of the following commands:
- enter the command toolbar:start(). from the command line after Erlang has been started.
- start Erlang with the command erl -s toolbar.
When started, Toolbar automatically checks for *.tool files in the current path and adds the corresponding tools. For each ebin directory found in the path, it will also look in a priv directory next to it. This is a function of the Erlang file structure.
You can update Toolbar with menu commands on Toolbar window. Refer to the File Menu and Tools Menu sections below for details.
1.1 Toolbar Window
The following illustration shows The Toolbar Window.

Figure 1.1: The Toolbar Window
Each icon on Toolbar represents a separate tool, which is started by clicking on the icon. You can also display place the mouse pointer over an icon to display the name of the tool at the bottom of Toolbar window.
The Toolbar window also has a menu which includes the following menu items:
- File menu
- Tools menu
- Help menu
These menu are described in the following sections.
The File menu
The File menu has the following two menu items:
- Update Toolbar
- Select this menu item to search for new tool files in the current path and add the corresponding tools to the Toolbar window. This action is performed automatically every the Toolbar application is started.
- Quit
- Select this menu item to exit the oolbar application.
The Tools menu
The Tool menu has the following menu items:
- Create Tool File
- Choose this menu item to display the Create Tools File Window, where you create a new tools file, or edit an existing tools file. This window is described in detail below.
- Add GS Contributions
- Choose this menu item to add GS contributions by entering the path to the directory where these tools are situated. GS contributions are user supplied tools which are included with the Erlang software release. These tools are not supported by Erlang/OTP.
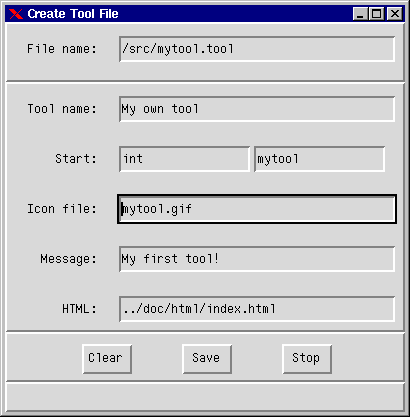
This window is displayed when you select Create Tool File from the Tools menu. The following illustration shows The Create Tool File Window.

Figure 1.2: The Create Tool File Window
Follow these steps to create a new tool file, or to edit an existing tool file:
- To edit an existing tools file, enter the file name of the tools file into the field File name and press Enter. The contents of the tool file are displayed in the information fields. Edit the information in the following fields as required.
- To create a new tools file, enter information into the following fields.
- When finished, select Update Toolbar from the File menu.
- File name. Enter the name of the tools file. The application will add the .tool suffix if omitted.
- Tool name. Enter the name of the tool. This field defaults to the name entered into the File name field. For example, if you enter mytool.tool as a file name, this field defaults to mytool.
- Start function. Enter a module name and a function name into the fields titled module and function respectively. The function must exist and take zero arguments.
- Icon file. Enter the file name of the icon to be displayed in the Toolbar. The file must be a bitmap file or a GIF image with the file extension .xbm or .gif respectively. If no path name is entered, the system assumes that the file is located in the same directory as the tools file. This field is optional.
- Message. Enter a descriptive string of maximum 30 characters for the tool. This field is optional. The information entered here is displayed at the bottom of the Toolbar window when the mouse pointer is placed on the Toolbar icon.
- HTML. Enter an URL, a HTML file name, or a plain text file name, which points to the help text file for the tool. An URL should be given in the form http://.... If no path is given, the system assumes that the file is located in the same directory as the tool file. For an HTML file name ending with .html, it is possible to add an index which points to a specific location in the file. This is written as .html#index. This field is optional.
The window has the following command buttons:
- Clear. Click on this button to clear the information fields.
- Save. Click on this button to save the information. A new tool file can be saved only when mandatory information such as file name, tool name and start function has been entered.
- Stop. Click on this button to quit the Create Tool File window.
No error check is performed on the information entered.
You must select Update Toolbar from the File menu to update the configuration and make the tool visible on the Toolbar.
The Help menu
The Help Menu has the following two menu items, plus additional help menu items for those tools which have a help system.
- About
- This menu item displays a short message about accessing the help information.
- Toolbar
- This menu item provides access to the Toolbar documentation.
