![[Erlang Systems]](min_head.gif)
1 The Erlang Interpreter
The Erlang Interpreterprovides mechanisms which make it possible to see what happens during the execution of code in specified (interpreted) modules, or when processes crash.
The interpreter is mainly used in order to locate errors in code (bugs), but it can also be used as a tool in order to understand and learn about applications written by others.
Since Erlang is a distributed, concurrent language, the conventional debugging techniques have had to be rethought. The Erlang interpreter thus provides mechanisms to attach and interact with several processes at the same time, both local processes and processes located at another Erlang node in a network of nodes. All processes running code in interpreted modules are monitored and continuous status information can be displayed for these processes.
When a process has been attached, the current point of the execution thread can be examined. Variable bindings and the contents of the message queue can be inspected. The execution of the process can be stepped by one expression at a time. It is even possible to manipulate the process thread of execution during interpretation by evaluating user provided expressions, where new values can be bound to variables. A bug can thus be fixed and the execution of the process resumed in order to locate another bug.
Processes can be stopped at certain points (break points) in the source code. A process is stopped before an expression at a source code line where a break point exists, is executed. At this point the stopped process can be attached. A process reaching a break point can also be automatically attached.
If a process terminates abnormally in an interpreted module, the process can be attached (after the termination) and the position in the source code, where the failure occurred, is shown. At this point variable bindings can be examined.
The real-time behavior of an application is influenced when modules are being interpreted:
- The execution speed is reduced for processes running interpreted modules.
- Break points only stop the execution of the affected process, not the whole system.
It must always be taken into consideration that stopping one process may influence another process. A process waiting for some response from a stopped process may time out and some other action may be taken. It may thus also be necessary to set break points for influenced processes, or change the specified timeout period (maybe to infinity) during interpretation.
Below is the main workflow for the Erlang Interpreter:
- Specify the module(s) to be interpreted.
- Set break points (if applicable).
- Start the application.
- Attach the process(es) of interest (single step, inspect variables, etc.) and study the flow of execution.
1.1 Terminology
- Attach - A process which is to be inspected is attached. The evaluation of the attached process will stop before the next interpreted expression is evaluated. Stopped and terminated processes can also be attached. An Attachment window per attached process is shown on the screen.
- Single Step - One expression at a time is evaluated. The behavior of an attached process can be studied expression by expression.
- Break Point - A specified position in the source code of a module, where the execution is to be stopped. A break point is global to all processes executing that module at all nodes.
- Trigger - A break point that is reached by a process triggers if it is active, and the execution of the process is stopped.
1.2 The Loading Mechanism
A module which is being interpreted is not loaded into the Erlang run-time system in the normal way. Interpreted modules are marked interpreted in the code_server process. Each interpreted module is loaded into the internal database of the interpreter.
Whenever a function in an interpreted module is called, the function
error_handler:undefined_functionis called as the module has not been loaded. The interpreter is invoked and the function call is interpreted.
When a module is not interpreted any longer, all processes with references to the module will be aborted.
Note: Once a process has used one version of an interpreted module, this version will be used throughout the execution of that process even if new versions are loaded for interpretation. Different versions of a module, can, however, be used for different processes.
1.3 Break Points
A
break pointis a position in the source code where the execution of a process is to be stopped. The position of a break point is defined by the name of amoduleand a source codeline (row) number. Break points can also be set per function, but such break points are translated into one break point per function clause.
The execution of process stops when an expression in a source code line containing a break point is reached. A break point located in a source code line where no executable expression exists is never reached. In the function
foo/2below, break points can only be located in lines 7, 8, 10 and 12:
6. foo(X, Y) ->
7.         Z = bar(X),
8.         case baz(Y) of
9.              true ->
10.                foo(Z, Y);
11.             false ->
12.                foo(X, Z)
13.        end.
1.3.1 Status and Action of Break Points
A break point can be disabled. A disabled break point never causes processes to stop the execution. A disabled break point can be enabled again and thus become active.
It is possible to specify what status each break point is to have when it triggers next time. This is defined as an action of the break point. The default action is to keep the break point active (enable). The action can make the break point inactive (disabled) or the break point can be removed (deleted).
1.3.2 Conditional Break Point
An active break point is triggered by default when it is reached by a process. A conditional break point checks some conditional requirements which indicate whether the break point is to trigger or not.
Conditional requirements on a break point must be provided by the user as a function
(Module:Function/1). This function is called whenever the break point is reached and must returntrue(stop the process) orfalse.
This function has one argument which is the current variable bindings of the current process. A function is provided in order to examine the binding of a specified variable, which can be used in order to decide whether the conditional break point is to trigger or not:
int:get_binding(Variable, Bindings)returnsunboundor{value, Value}.1.4 Automatic Attaching of Processes
1.4.1 Attaching New Processes
If every process entering interpreted code for the first time is to be attached, the automatic attach function flag should be set. Automatic attach is activated either by typing the command:
int:auto_attach(init).or by clicking the desired attach flag in the Properties menu in the Monitor window (described below).
When automatic attach is active an Attachment window (described below) is shown whenever a new process calls a interpreted function for the first time. The calling process stops the execution before any of the expressions in the interpreted function have been evaluated.
The automatic attach processes can be active even if no Monitor window is opened. Attachment windows are nevertheless shown.
1.4.2 Attach on Break and Exit
Processes can be automatically attached either on reaching a break point or when terminating. This facilities can only be initiated by command:
int:auto_attach(Flag)where Flag is
break,exit(orinit), or a list of these flags.1.4.3 Follow a Spawn
A special case while single stepping a process is when the next expression contains
spawn(create a new process). If single step (the Step button described for the Attachment window below) is used for this expression, the new process will be automatically attached the first time it enters interpreted code.1.5 The Monitor Window (Main Window)
Normally an interpreter session is started by opening a Monitor window. The Monitor window is started by typing the command:
int:m().or by clicking the Debug button in Xerl.
Status information for all processes running code in interpreted modules is always displayed in the Monitor window. The Monitor window can be opened and closed dynamically during a session with the interpreter. Several Monitor windows can also be open at the same time. Whenever a Monitor window is opened, the current status information for all existing interpreted processes is initially displayed.
Interpreted processes at all known (connected) nodes are displayed in the Monitor window. The Monitor window can be opened at a node running on a machine with X-windows and it is thus possible to attach processes at nodes without graphics.
All functionality of the Erlang Interpreter can be accessed from the Monitor window.
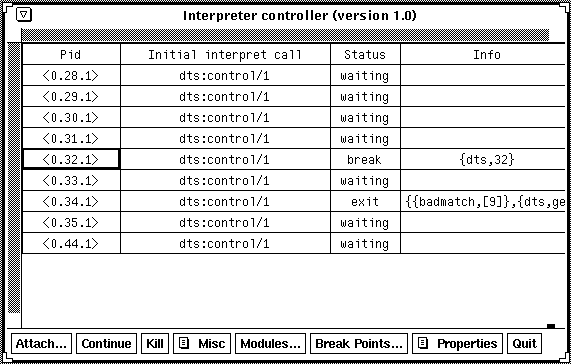
The Interpreter Monitor (Controller) window.1.5.1 The Process Display
In the upper part of the Monitor window the process status information is displayed. There is one process per line, and each line is divided into four fields:
Pid: The process identity of the process displayed in the line.
Initial call: The first call to an interpreted function by this process.
(Module:Function/Arity)
Status: The current status (
state) of the displayed process, where status is:
- idle - interpretation finished (for now). The interpreted function call has returned a value.
- running - The process is evaluating interpreted code or is waiting for a compiled function call to return a value.
- waiting - A
receivestatement is interpreted and the process is waiting for messages to arrive.
- break - The process has stopped execution. A break point is reached or code is single stepped. Additional information is the location of the current source code.
- exit - The process has terminated. Additional information caused the termination.
- no_conn - The connection to the Erlang node holding the process has been broken.
Info - Additional information. Contains either information of the location where the process stopped execution,
{Module, LineNumber}, or the reason why the process terminated.
Note: In a distributed system where processes are running interpreted code at several nodes, all processes are displayed in the Monitor window.
In order to attach a process, double click the desired process line or select a process with a click and press the Attach... button. An Attachment window is shown (described below).
1.5.2 The Buttons
The Monitor window contains the following buttons:
Attach...: Attach the selected process. An Attachment window (described below) is shown. This button is disabled if no process is selected in the display area of the Monitor window.
Continue: Resume the execution, if the selected process has stopped execution. This button is enabled if the selected process has stopped the execution.
Kill: Abort the selected process. This button is enabled if the selected process has not terminated.
Misc: The Miscellaneous menu contains the following items:
The Miscellaneous menuRefresh: Redraw all displayed information in the display section of the window.
Clear: Remove all terminated processes from the interpreter.
Kill All: Abort all processes with references to interpreted modules.
Modules...: Open the Module window (described below). Which modules that are to be interpreted is manipulated with the aid of this window.
Break Points...: Open the Break Points Monitor window (described below).
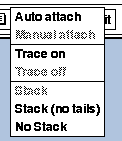
Properties: The Properties menu contains the following items (the disabled items are the current property values):
The Properties menuAuto attach: Activate automatic attach to processes. A process calling a function in a interpreted module for the first time will be attached automatically (an Attachment window is shown).
Manual attach: Deactivate automatic attach.
Trace on: Activate trace. Processes being attached will have trace printouts by default.
Trace off: Deactivate trace.
Stack: Keep all stack frames per interpreted process.
Stack (no tails): If processes with a very long life time and a lot of tail recursive calls are interpreted, no tail recursive call are kept in the stack.
No Stack: Keep no call frames in the stack at all.
Quit: Terminate the Monitor window. (Processes being interpreted are not affected)
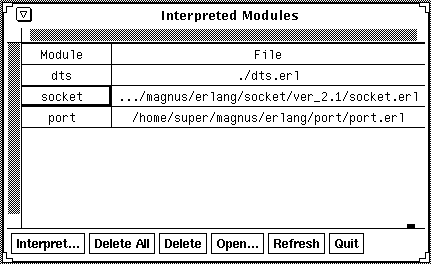
1.6 The Module Window
The name of all interpreted modules with their corresponding source code file names are displayed in the Module window. Modules to be interpreted can be added and deleted from this window.
Note: In a distributed environment modules added (or deleted) for interpretation will be added (or deleted) at all known Erlang nodes.
The Module window.The Module window is divided into two sections, one display area and one button area.
1.6.1 The Module Display
In this section of the window the module names and file names of all interpreted modules are displayed. A File Viewer window (described below) can be opened by double clicking the desired module line, or by selecting a module line and pressing the Open button.
If a module has not been loaded (but marked as being interpreted) the text not loaded is displayed as the corresponding file name. The reason for a module not being loaded is normally that there are errors in the source code file.
1.6.2 The Buttons
The Module window contains the following buttons:
Interpret...: Open the Interpret Module window (described below) where new modules to be interpreted can be specified.
Delete All: Do not interpret any modules. Processes with references to interpreted modules are killed.
Delete: Do not interpret the selected module. Processes with references to this module are killed.
Open...: Open the File Viewer window (described below) for the selected module.
Refresh: Redraw all displayed information in the display area of the window.
Quit: Terminate the Module window.
1.6.3 Commands
In order to add or delete interpreted modules from the Erlang shell the following commands can be specified.
- To interpret a module (or a list of modules):
int:i(Module) or int:i([Module, Module, ...])
- To interpret a module specified with absolute path (or a list of modules):
int:a(AbsModule) or int:a([AbsModule, AbsModule, ...])
- To specify that module(s) are not to be interpreted:
int:n(Module) or int:n([Module, Module, ...])
- To distribute the commands above at all known Erlang nodes:
int:ni(Module) or int:ni([Module, Module, ...])
int:na(AbsModule) or int:na([AbsModule, ...])
int:nn(Module) or int:nn([Module, Module, ...])
Note: Compiling an interpreted module using
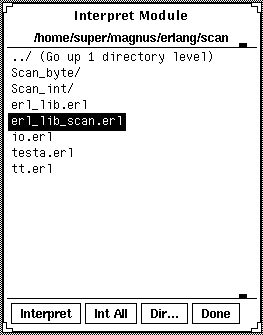
c:c/1, c:c/2, c:nc/1orc:nc/2is the same as using the commands above in order to recompile and reload the module.1.7 The Interpret Module Window
Select a file (module) to be interpreted and press the Interpret button. Alternatively, double click the selected file name with the left mouse button. Changing directory is performed in a similar manner.
Note: Only files with the
.erlsuffix are displayed in the browser.
The Interpret Module windowThe Interpret Module window contains the following buttons:
Interpret: Interpret the selected file (module) or change directory.
Int All: Interpret all modules located in the current directory. When all modules have been interpreted the window disappears.
Dir...: The Change Directory Window is displayed. This is useful when wanting to avoid repeatedly changing directory by selecting and loading.
Done: No more modules will be attached, the window is closed.
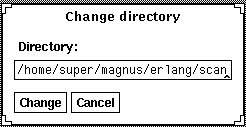
1.7.1 The Change Directory Window
Change directory by entering a directory path.
The Change Directory WindowThe Change directory window contains the following buttons:
Change: Change directory to the one with the specified path.
Cancel: Cancel the operation and close the window.
1.8 The Break Points Monitor Window
The Break Points monitor window contains information about all existing break points. Options for, and status of, selected break points can be changed. New break points cannot be introduced in this window.
Note: Break Points can also be manipulated from the Attachment window (described below).
The Break Points Monitor windowThe Break Points Monitor window is divided into two parts, the display area and the buttons area.
1.8.1 The Break Point Display
The information displayed is divided into five fields (one break point per line):
Module: The name of the module in which the break point is located.
Line#: The line number in the source code file in which the break point is located.
Status: The status of the break point, either active or inactive.
Action: The status which the break point is to have after it is reached and triggered the next time (Only an active break points are triggered). The values of action can be one of the following:
Enable: The break point will remain active.
Disable: The break point will be inactive.
Delete: The break point will be removed (deleted).
Condition: Conditional requirements for the break point to trigger (if any) are indicated. The function holding the condition is displayed as the tuple
{Module, Function}.1.8.2 The Buttons
The Break Points Monitor window contains the following buttons:
Note: The menu item corresponding to the current value of the selected break point is disabled.
Status: The Status menu contains the following items:
The Status menuActive: Activate the selected break point.
Inactive: Deactivate the selected break point.
Action: The Action menu contains the following items:
The Action menuEnable: Make the break point remain active after it is triggered the next time.
Disable: Make the break point inactive after it is triggered the next time.
Delete: Delete the break point when it is triggered the next time.
Condition: The Condition menu contains the following items:
The Condition menuNew...: Specify a new condition for the selected break point. The Create Condition window is displayed.
Clear: Delete the condition of the selected break point. (This menu item is disabled if there is no condition for the selected break point)
Delete: Delete the selected break point.
Delete all: Delete all existing break points.
Show...: Open a File Viewer window (described below) with the source code line of the selected break point highlighted. A File Viewer is also opened if a break point is double clicked.
Refresh: Redraw all displayed information in the display area of the window.
Quit: Terminate the Break Points Monitor window.
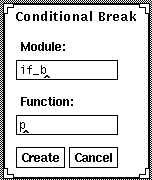
The Create Condition Window
Specify the name of the function which contains the condition for the break point. The name of the module and the name of the function must both be supplied. The specified function must have arity 1.
The Create Condition windowThe Create Condition window contains the following buttons:
Create: Mark that the specified conditional function is to be used for the break point.
Cancel: Cancel the operation and close the window.
1.8.3 Commands
The following commands can be specified in the Erlang shell in order to manipulate break points (see the
int(3)manual page for more details).
- To create a new break point (which cannot be accessed from this window):
int:break(Module, Line)
- To delete the specified break point:
int:delete_break(Module, Line)
- To delete all break points:
int:no_break()
- To delete all break points in a specified module (which cannot be accessed from this window):
int:no_break(Module)
- To activate the specified break point:
int:enable_break(Module, Line)
- To deactivate the specified break point:
int:disable_break(Module, Line)
- To set a new action at break for the specified break point. Action below is one of the atoms: enable, disable, and delete.
int:action_at_break(Module, Line, Action)
- To specify a conditional function for the specified break point:
int:test_at_break(Module, Line, {Mod, Fnk})
1.9 The Attachment Window
In the Attachment window the user interacts with an interpreted process. It is possible to single step the execution of a process, inspect variable bindings, manipulate break points, etc.
A process is either attached with the aid of the Monitor window or the automatic attach facility.
One Attachment window is opened for each attached process. It is possible to interact with several processes at the same time and single step one process (in one Attachment window) until a message is sent and when it is received in another process, that process is also single stepped (in another Attachment window).
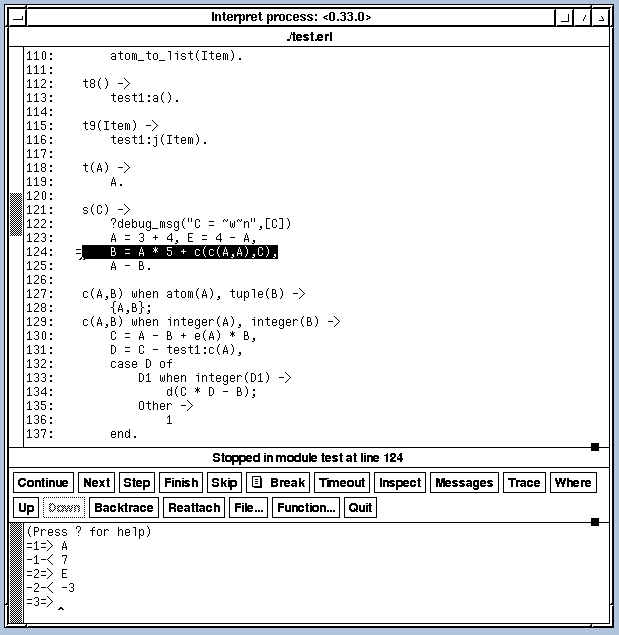
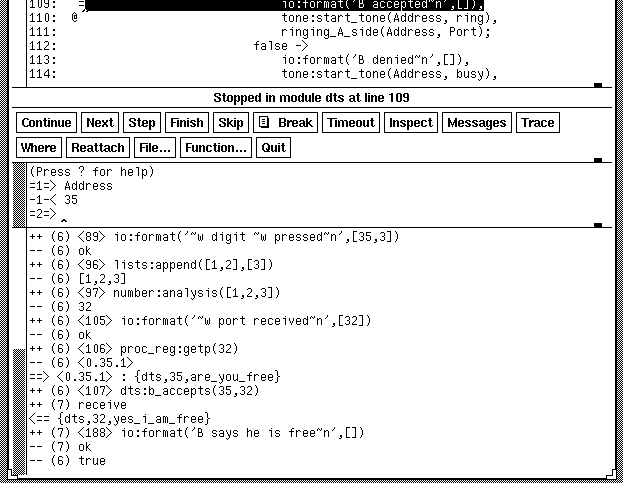
The Attachment window (without the trace area)The Attachment window is divided into four parts, the source file area, the button area, the shell area and the trace area. The trace area is dynamically created and deleted.
Note: All key strokes are directed towards the shell area.
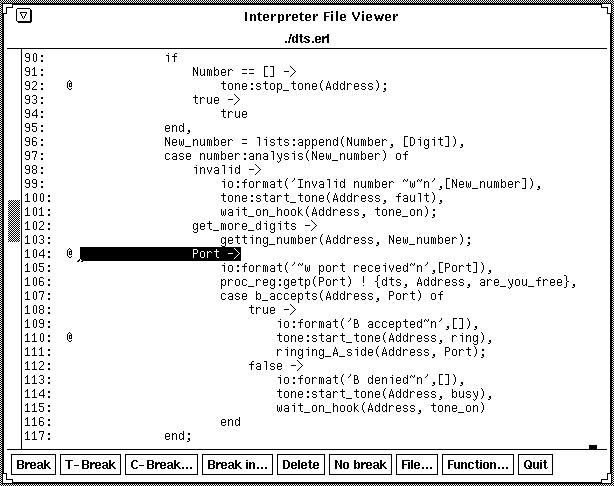
1.9.1 The Source File Area
The full path name of the displayed source code file is shown at the top of the source file area. (If the path name is too long to be displayed, the preceding directory names are taken away, and are replaced by the symbol ".../")
The contents of the source file is displayed with an extra preceding column (with eight character positions) where the line numbers are displayed. The current line is marked with an `=' sign in the eighth character position of the column. An existing break point at a line is displayed with an `@' sign in the seventh character position. In the example below, the execution of the source code is currently at line 37 (before the execution of the spawn BIF). The same example also contains a break point at line 35.
34:                List = lists:append(L1, L2),
35:     @       case lists:member(1, List) of
36:              true ->
37:     =          spawn(ex, start,[]);
The whole of the current line is also selected (by the line being inverted).
1.9.2 The Buttons
The Attachment window contains the following buttons:
Continue: Continue the execution from where it stopped, for example at a breakpoint. This button is only enabled when the process has stopped execution.
Next: Execute the next program line, step over any function calls of the line. This button is only enabled when the process has stopped execution.
Step: Execute next program line, step into any function calls of the line. If single step is used over a
spawn, the process is automatically attached to the created process (the new process is followed) the first time the new process evaluates interpreted code. This button is only enabled when the process has stopped execution.
Finish: Continue execution until the current function call returns a value. This button is only enabled when the process has stopped execution.
Skip: Do not execute (skip) next program line, but move the current location to the next source code line. This function is useful when a bug has been located but evaluation is to continue after a correct expression has been evaluated (in the shell area). If the last expression of a function is skipped, the atom skipped is returned by that function. This button is only enabled when the process has stopped execution.
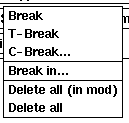
Break: (Menu) Manipulate break points. The contents of the menu is dependant on where in the source code file the cursor is positioned. The menu contents is related to the possible existence of a break point at the current (cursor) line.
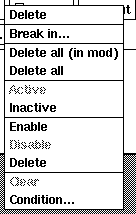
If there is no break point at the current line, the menu contains the following items:
The Break menu with no break point at the current line.Break: Set a new break point at the current line.
T-Break: Set a new (temporary) break point at the current line. This break point will be deleted the first time it is triggered.
C-Break...: Set a new conditional break point at the current line. The Create Condition window is displayed in order to request the associated condition.
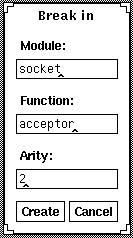
Break in...: Set a new break point for every clause of the specified function. The Break in Function window is displayed to request the function.
Delete all (in mod): Delete all break points located in the module currently displayed in the Attachment window. This menu item is disabled if no break points exist in the current module.
Delete all: Delete all existing break points. This menu item is disabled if there are no break points.
If there is already a break point at the current line the menu contains the following items:
The three lower parts of this menu shows the current options of the break point at the current line. The disabled menu item (at each of the areas) corresponds to the option set. The options are: Status, Action, and Condition. In the figure below Status is active, Action is disable and there is no Condition set (there is nothing to clear):
)
The Break menu with an existing break point at the current line.Delete: Delete the break point at the current line.
Break in...: Set a new break point for every clause of the specified function. The Break in Function window is displayed with a request for the function.
Delete all (in mod): Delete all break points located in the module displayed in the Attachment window.
Delete all: Delete all existing break points.
Active: Activate the break point at the current line.
Inactive: Deactivate the break point at the current line.
Enable: Make the break point (at the current line) still active after it is triggered the next time.
Disable: Make the break point (at the current line) inactive after it is triggered the next time.
Delete: Delete the break point (at the current line) the next time it is triggered.
Clear: Remove the associated condition of the break point at the current line.
Condition...: Specify a new condition for the break point at the current line. The Create Condition window is displayed.
Timeout: Simulate a timeout. This button does only have effect if a
receiveexpression containing anafterclause is being executed.
Inspect: Write the Erlang term bound to the selected variable. A variable is selected in the source code area of the Attachment window, and the actual binding is displayed in the shell area.
Messages: Inspect the message queue of the process.
Trace: Start/stop tracing execution. When Trace is started, the trace area of the Attachment window is created. The trace area is destroyed when Trace is stopped.
Where: Show the current position of execution. If execution is stopped the current line is selected. If the process is attached but has not yet stopped, the source code location of the expression being executed at the moment when the process is attached, is displayed. In this case only one character in the associated line is selected.
Up: Inspect the previous stack frame.
Down: Inspect the next stack frame.
Backtrace: Display the ten latest frames in the stack.
Reattach: Attach the process again using the same Attachment window. This is useful if the execution has been continued, but control of the process is to be regained.
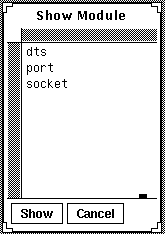
File...: Display a specified source code file in the source file area. The Select Module window is displayed. The source code file corresponding to the version of the selected module used by this process is displayed.
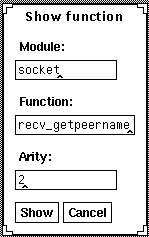
Function...: Search for and display the specified function in the source file area of the Attachment window. The Select Function window is displayed. The source code file corresponding to the version of the selected module (:function) used by this process is displayed.
Quit: Close the Attachment window. The execution of the process which was attached is not affected.
The Break in Function Window
Specify the name of a function to set a break point in. The name of the module, the name of the function and the arity of the function must be specified.
The Break in Function windowAs break points are line oriented, one break point for every clause of the function will be inserted.
The Break in Function window contains the following buttons:
Create: Set a break point in the provided function.
Cancel: Cancel the operation and close the window.
The Select Module Window
Select a module in the browser. The source code file corresponding to the selected module is displayed in the source code area of the Attachment window.
Only source code of interpreted modules can be displayed in the Interpreter and only interpreted modules are thus listed in this browser.
The Select Module windowThe Select Module window contains the following buttons:
Show: Display the source code which corresponds to the selected module, or double click one of the modules.
Cancel: Cancel the operation and close the window.
The Select Function Window
Specify the name of a function which is to be found and displayed. The name of the module, the name of the function and the arity of the function must be specified.
The Select Function windowThe Select Function window contains the following buttons:
Show: Display the source code which corresponds to the supplied module:function/arity and locate the function.
Cancel: Cancel the operation and close the window.
1.9.3 The Shell
The shell provides a command interface to the interpreter for the attached process. The same functionality as for the buttons (in the button area) can be obtained by commands. It is also possible to use short cuts for almost every button. Erlang expressions can be evaluated in the scope of the attached process. Expressions can only be evaluated when the process is stopped. The exceptions are single variable expressions (inspection of variable bindings). If, for example, the bound value of the variable
ThisVaris to be inspected, write the expressionThisVar. in the shell.
A special purpose command (
send) is provided in order to make it possible to send messages to the attached process while the process is suspended in areceiveexpression. Since the process is suspended, only ground Erlang terms can be sent.
Responses to some button actions are also displayed in the shell, for example the inspection of the message queue. All Erlang terms are pretty printed in the shell, i.e. deep terms are indented.
All user key interactions with the Attachment window are directed towards the shell area independently of where the cursor is positioned in the window.
The prompt =N=> is shown in the shell, where N is a command counter. In order to indicate the relationship between results and the corresponding command, results are prepended with -N-<, where N has the same meaning as above.
Evaluation of Erlang Expressions
When the attached process has stopped execution, it is possible to evaluate Erlang expressions from the shell area in the Attachment window. If this facility is used, it is possible to modify the behavior of the process, when a bug has been located. The bug can be corrected and execution can be resumed.
Expressions are evaluated within the current scope of the attached process. Variables in the set of the current variable bindings are used, messages in the queue can be received, etc. Functions which are called without a module prefix are assumed to be located in the current module, i.e. a local call.
As all expressions are evaluated within the scope of the attached process, faulty expressions will generate EXIT signals in the normal way. In order to protect the process from faulty expressions, a surrounding
catchcan be used.
Normally, it is not possible to bind a new value to an already bound Erlang variable. However, the semantics of the match operator in the shell of the Attachment window is modified to allow this. It is it possible for a a new value to be bound to the variable, i.e.
Variable = Expression, only if the match expression is the outermost expression, and if the left hand side is a single variable.
In the example below the variable
Ais initially bound to3. After the second expressionAis bound to4. The third expression fails, as it is an attempt to match two different tuples, andAis not bound to3.
=1=> A.
-1-< 3
=2=> A = 4.
-2-< 4
=3=> catch {A, 3} = {3, 3}.
-3-< {`EXIT', {{badmatch, {3, 3}}, Fnk}}
Note: For the last expression there is a surrounding catch in order to prevent the process terminating.
If a process has not stopped execution but has just been attached, for example the process is suspended in a
receiveexpression or is waiting for an external function call to return a value, only variables can be inspected.
Commands
Commands are specified with a preceding
":", a command mode identifier. The commands can be fully specified or in short form. The short form is normally the character preceding the command, for example,:mis equal to:messages.
The commands are summarized in the table below:
Note: The special command send is only available as a command, which makes it possible to send messages to the process itself, while the actual process is suspended waiting for messages to arrive. Only ground Erlang terms can be sent.
Command Function :(se)nd Message Send the ground Message term to the process itself. :(c)ontinue Continue execution. :(n)ext Execute the next line, step over any function calls. :(s)tep Execute the next line, step into any function calls. :finish Continue execution until the current function returns a value. :(sk)ip Do not execute the next line. :(b)reak Module Line Set a break point at Line in Module. :(tb)reak Module Line Set a temporary break point at Line in Module. :breakin Module Function Arity (:bin) Set a break point for every clause in Function. :(d)elete Module Line Delete the break point at Line in Module. :delall (:da) Delete all break points. :(t)imeout Simulate a timeout. :(m)essages Inspect the message queue of the process. :(tr)ace Start/Stop tracing. :(w)here Show the current position in the source code. :(u)p Inspect the previous stack frame. :(do)wn Inspect the next stack frame. :backtrace (:bt) Display the ten latest frames in the process stack. :(r)eattach Make a new attachment of the process. :file Module Display the source code of Module. :func Module Function Arity Display the specified function, Module:Function/Arity. Commands in the Attachment window Short-Cuts
The following key sequences can be used as short-cuts for the buttons.
Note: The notation C-a means pressing the control key and the letter a key simultaneously
Key sequence Button C-x C-c Continue C-x C-n Next C-x C-s Step C-x C-f Finish C-x C-k Skip C-x C-b Break=>Break C-x C-o Break=>T-Break C-x C-v Break=>C-Break... C-x C-d Break=>Delete C-x C-e Break=>Delete all C-x C-t Timeout C-x C-i Inspect C-x C-m Messages C-x C-r Trace C-x C-w Where C-x C-x Up C-x C-y Down C-x C-z Backtrace C-x C-a Reattach C-x C-l File... C-x C-u Function... C-x C-q Quit Button Short-cuts Define Your Own Short-Cuts
It is possible to specify your own short-cuts. This is done by adding some lines to your
~/.Xdefaultsfile. For example, if the short cut for Continue is to be the function key F2, and for Step F3, write the following into your file:
*erl.intshell.Translations: #override \
KeyF2: catch-event(ctlXC) \n\
KeyF3: catch-event(ctlXS)
The new default can be loaded by:
xrdb -load ~/.Xdefaults
The convention used for the added catch-event is that the key sequence
C-x C-Yis translated into the stringctlXY. Only the defined key sequences above can be used.1.9.4 The Trace Area
Trace is activated for this process while the trace area of the Attachment window is active. In this window trace information is continuously written. Information (and return values) are written for each interpreted function call, sent and received messages and for each interpreted
receivestatement.
The trace area of the Attachment windowThe annotation
++(N)Ldenotes a function call, whereNis the level of recursion andLis the corresponding line of the source code of the call.--(N)denotes a function return value.
Note: Return values of calls with last call optimization are not traced.
==> Pid :
Msgdenotes that the messageMsgis sent to process Pid.
<== Msg denotes the reception of the messageMsg.
In order to indicate that a process is suspended on a interpreted receive statement, the text
++(N)receive (with timeout) is written, the text with timeout is appended if there is an after statement in thereceive.1.10 The File Viewer Window
The File Viewer window is primarily used for manipulating break points, especially before any interpretation of Erlang processes have started, as this is the only way to view source code at this stage.
If the File Viewer window is opened from the Break Point Monitor window, a break point is highlighted and displayed by default.
The File Viewer window is divided into two parts, the source code area and the buttons area.
The File Viewer window1.10.1 The Source File Area
The full path name of the currently displayed source code file is displayed at the top of the source file area. (If the path name is too long to be displayed, the preceding directory names are stripped. This is shown by the symbol ".../" preceding the name.)
The contents of the source file is displayed with an extra preceding column (with eight character positions), in which the line numbers are displayed. An existing break point of a line is displayed with an `@' sign at the seventh character position. The layout is the same as in the Attachment window.
1.10.2 The Buttons
The File Viewer window contains the following buttons:
Break: Set a new break point at the current line.
T-Break: Set a new (temporary) break point at the current line. This break point will be deleted the first time it is triggered.
C-Break...: Set a new conditional break point at the current line. The Create Condition window (described above) is displayed in order to specify the associated condition.
Break in...: Set a new break point for every clause of the specified function. The Break in Function window (described above) is displayed with a request for the function.
Delete: Delete the break point of the current line.
No break: Delete all break points from the displayed module.
File...: Display a specified source code file in the source file area. The Select Module window (described above) is displayed. The source code file corresponding to the last loaded version of the selected module will be displayed.
Function...: Locate and display the specified function in the source file area of the Attachment window. The Select Function window (described above) is displayed. The source code file corresponding to the last loaded version of the selected module:function/arity will be displayed.
Quit: Close the File Viewer window.